GitLab Runner
GitLab Runner is a service that runs jobs in CI/CD pipeline on your server. You can use shared runners from GitLab or install your own runner.
Documentation is available here and GitLab Runner binaries.
TIP
You have repository runner and group runner. Repository runner is available only for this repository, group runner is available for all repositories in this group.
You can find your runners in Settings > CI/CD > Runners or in Settings > Build > Runners.
- Example for group: https://gitlab.com/groups/GROUP/-/runners
- Example for repository: https://gitlab.com/GROUP/REPOSITORY/-/settings/ci_cd
Install GitLab Runner
Documentation is available here.
Add the official GitLab repository to your system.
curl -L "https://packages.gitlab.com/install/repositories/runner/gitlab-runner/script.deb.sh" -o script.deb.sh
sudo bash script.deb.sh
Install GitLab Runner.
sudo apt udpate
sudo apt install -y gitlab-runner-helper-images gitlab-runner
Now service is installed and running.
sudo systemctl status gitlab-runnerGitLab Runner registration
Now go to your GitLab instance and choose any project. Go to Settings > CI/CD and expand Runners section.
INFO
Your runner will be available for all projects in your GitLab instance.
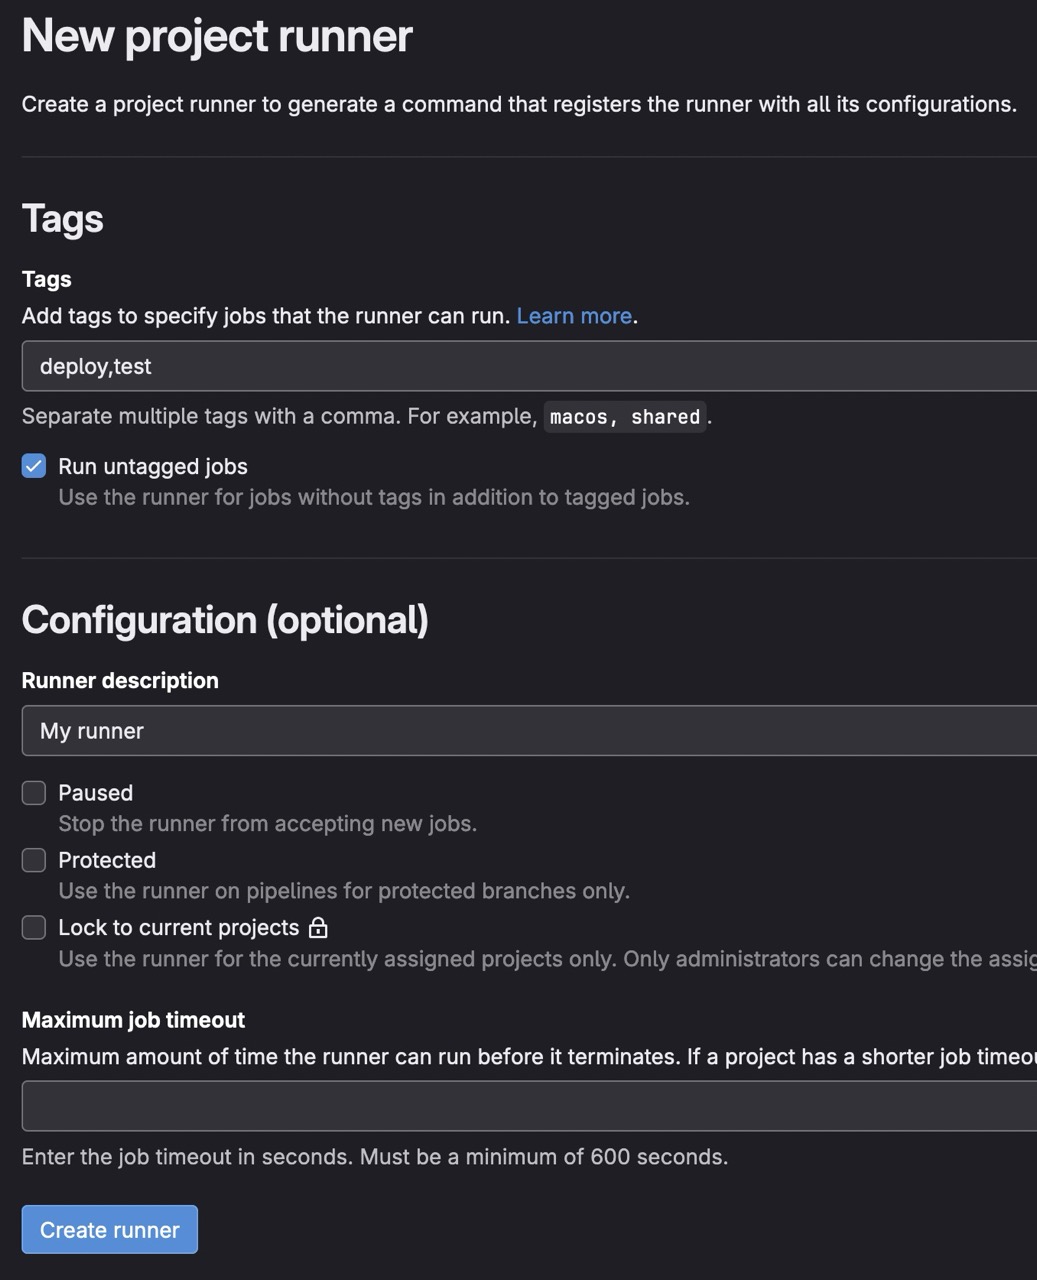
Select New project runner

You will a new screen to config your runner.
INFO
I advice to check Run untagged jobs and pay attention to Tags field. You have to set tags used in your .gitlab-ci.yml file. In my example, my configs use often deploy and test tags. If a job has deploy tag, it will be executed by this runner, BUT if a job is tagged with docker tag, this runner will not execute it.
# Tag used here is `deploy`, so this job will be executed by runner with `deploy` tag
stages:
  - deploy # This is a stage

deploy-job:
stage: deploy # This is a jobWhen you finish, click on Create runner.
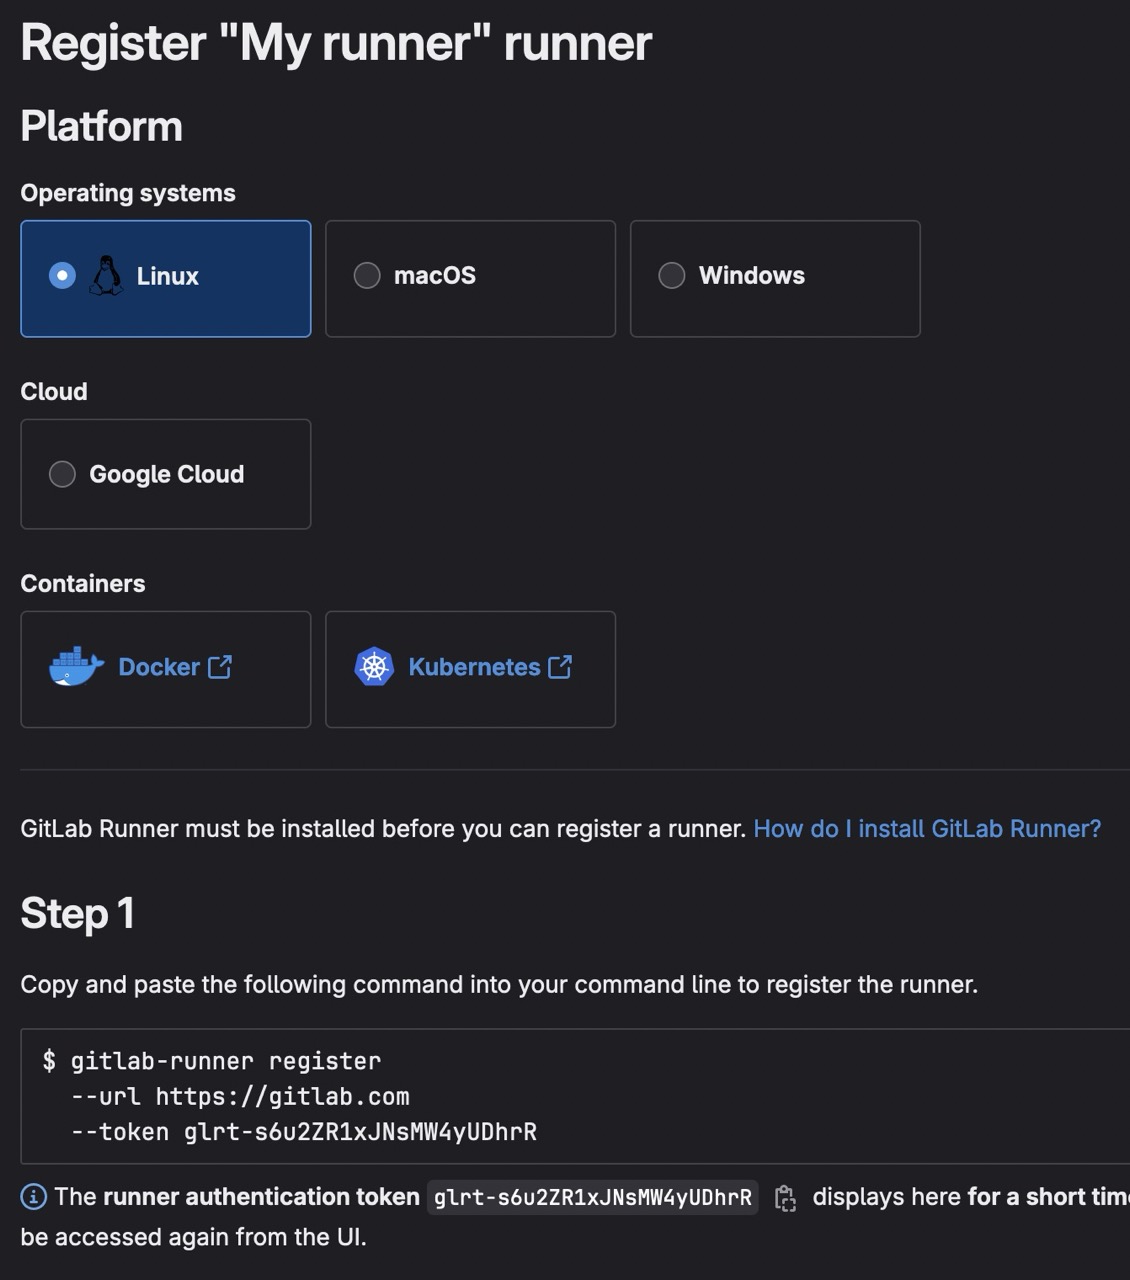
On new screen, keep Linux for the Operating systems and pay attention to the token. In this example, it's glrt-s6u2ZR1xJNsMW4yUDhrR, keep it for the next step.
Configuration on server
Now, you have to register your runner on your server.
Copy Step 1 from GitLab website command to register your runner on your server.
gitlab-runner register --url https://gitlab.com --token TOKENEnter the GitLab instance URL (for example, https://gitlab.com/):I choose https://gitlab.com/ because I use GitLab SaaS. If you use your own GitLab instance, you have to enter your URL.
Enter a name for the runner. This is stored only in the local config.toml file:You can enter any name you want. I keep default name, it's hostname.
Enter an executor: ssh, docker, docker-autoscaler, custom, shell, docker-windows, docker+machine, kubernetes, instance, parallels, virtualbox:I choose docker because I want to execute my jobs in Docker containers.
Enter the default Docker image (for example, ruby:2.7):If you choose docker executor, you have to enter a default Docker image. I choose alpine:latest.
Runner registered successfully. Feel free to start it, but if it's running already the config should be automatically reloaded!

Configuration (with the authentication token) was saved in "/home/$USER/.gitlab-runner/config.toml"Enable Runner for project
Now, you have to enable your runner for your project.
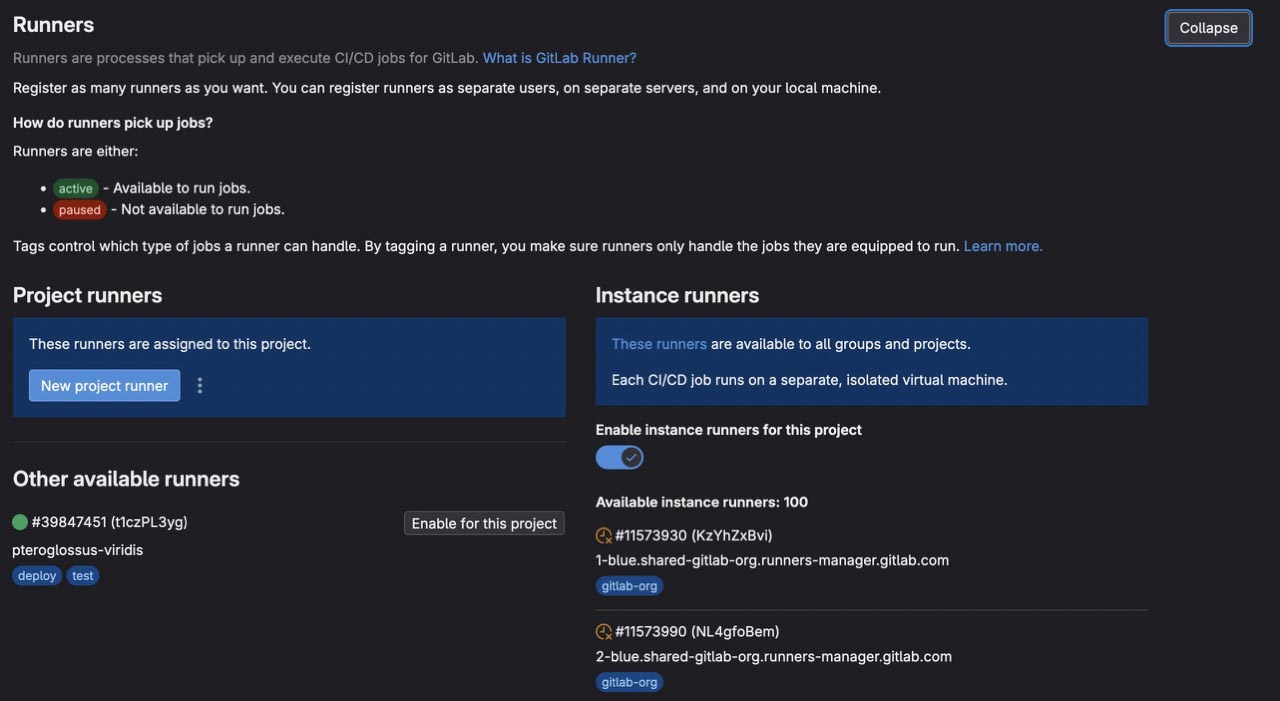
Go to your project in GitLab, and go to Settings > CI/CD > Runners.
You will see your runner in the Project runners list, click on Enable for this project.
INFO
You can disable GitLab shared runners, to use only your runners. See right panel with Instance runners and uncheck Enable instance runners for this project.
Runner stuck or pending
If your runner is stuck or pending, you can check the following:
sudo gitlab-runner listYou have to see your runner in the list. But if you see this:
# here no runners, it your runner is not executing jobs
Runtime platform                                    arch=amd64 os=linux pid=162711 revision=2b813ade version=18.1.1
Listing configured runners ConfigFile=/etc/gitlab-runner/config.tomlYou can check your runner configuration file in /etc/gitlab-runner/config.toml, if you don't see your runner, it could be registered with current user.
sudo cat /etc/gitlab-runner/config.tomlIf you see your runner into this file, you have to replace original configuration file with current user configuration file.
cat ~/.gitlab-runner/config.tomlReplace configuration file
sudo mkdir -p /etc/gitlab-runner
sudo cp /home/$USER/.gitlab-runner/config.toml /etc/gitlab-runner/config.toml
sudo chown -R root:root /etc/gitlab-runner
sudo systemctl restart gitlab-runner
Now, you can check your runner status.
sudo gitlab-runner statusYou have to see your runner in the list.
Runtime platform                                    arch=amd64 os=linux pid=175244 revision=2b813ade version=18.1.1
Listing configured runners                          ConfigFile=/etc/gitlab-runner/config.toml
RUNNER_NAME Executor=docker Token=TOKEN URL=https://gitlab.comCommands
Start
sudo gitlab-runner startStatus
sudo gitlab-runner statusStop
sudo gitlab-runner stopUnregister
sudo gitlab-runner unregister --all-runnersTips
Deploy from GitLab CI/CD
To deploy your project from GitLab CI/CD, you have to add your SSH key to your GitLab project.
- In
before_scriptstep, you have to add your SSH key to the runner - In
scriptstep, you can deploy your project
INFO
To know more about GitLab CI/CD variables, check this guide.
We take an example with this base .gitlab-ci.yml file:
stages:
  - deploy

deploy-job:
  stage: deploy
  image: node:20.16.0
  before_script:
  script:
  only:
- mainSSH key
In this part, you have to add your SSH key to your GitLab project. You have to add three variables:
TIP
Create a dedicated SSH key for your runner, don't use your personal SSH key. Keep your current SSH key in a safe place, and create a new one for your runner.
ssh-keygen -t ed25519Rename it
mv ~/.ssh/id_ed25519 ~/.ssh/id_ed25519_gitlab
mv ~/.ssh/id_ed25519.pub ~/.ssh/id_ed25519_gitlab.pub
Allow public key ~/.ssh/id_ed25519_gitlab.pub on your runner server
echo "ssh-ed25519 YoUr-PuBliC-KeY gitlab@your-device" >> ~/.ssh/authorized_keysAnd add private key ~/.ssh/id_ed25519_gitlab to your GitLab CI/CD Variables (with prefix and suffix).
SSH_PRIVATE_KEY: Your SSH private keySSH_PORT: Your SSH port, like22SSH_IP: Your SSH IP, like123.456.789.0
TIP
To avoid to repeat your variables, you can add them as group variables, to know more about group variables, check this guide.
  before_script:
    - "command -v ssh-agent >/dev/null || ( apk add --update openssh )"
    - eval $(ssh-agent -s)
    - echo "$SSH_PRIVATE_KEY" | tr -d '\r' | ssh-add -
    - mkdir -p ~/.ssh
    - chmod 700 ~/.ssh
    - ssh-keyscan -p $SSH_PORT $SSH_IP >> ~/.ssh/known_hosts
    - chmod 644 ~/.ssh/known_hosts
    - apt-get update -qq && apt-get install -y -qq sshpass
- apt-get install -y -qq rsyncNow, your SSH key is added to your runner, and your runner can clone your project, private or public.
INFO
In this example, I add rsync to my runner to deploy my project.
Build
In this part, you have to build your project. In this example, we use a Memorandum, a Vitepress project.
In these steps, we clone the project, install dependencies and build the project.
  before_script:
    - echo "Checkout..."
    - git clone https://gitlab.com/kiwilan/memorandum.git
    - cd memorandum
    - npm install -g pnpm
    - pnpm i
    - echo "Building..."
- pnpm buildDeploy
In this part, you have to deploy your project.
- We use
rsyncto copy thedistfolder to our server. - We use
sshto connect to our server and pull the project.
Why don't build on the server?
You can build your project directly on your server, but it will take some seconds and during this time, your site will be down. With current method, your site will receive the new version only when the build is finished.
  script:
    - rsync -azPhhr -e "ssh -p $SSH_PORT" .vitepress/dist $SSH_USER@$SSH_IP:/home/$SSH_USER/www/$CI_PROJECT_NAME/.vitepress/dist-$CI_JOB_ID
    - ssh -p $SSH_PORT $SSH_USER@$SSH_IP "
      . ~/.zshrc &&
      cd /var/www/$CI_PROJECT_NAME &&
git pullINFO
The $CI_JOB_ID variable is available in GitLab CI/CD. You can find a list of predefined variables here: https://docs.gitlab.com/ee/ci/variables/.
Complete .gitlab-ci.yml
stages:
  - deploy

deploy-job:
  stage: deploy
  image: node:20.16.0
  before_script:
    - "command -v ssh-agent >/dev/null || ( apk add --update openssh )"
    - eval $(ssh-agent -s)
    - echo "$SSH_PRIVATE_KEY" | tr -d '\r' | ssh-add -
    - mkdir -p ~/.ssh
    - chmod 700 ~/.ssh
    - ssh-keyscan -p $SSH_PORT $SSH_IP >> ~/.ssh/known_hosts
    - chmod 644 ~/.ssh/known_hosts
    - echo "Installing dependencies..."
    - apt-get update -qq && apt-get install -y -qq sshpass
    - apt-get install -y -qq rsync
    - echo "Checkout..."
    - git clone https://gitlab.com/kiwilan/memorandum.git
    - cd memorandum
    - npm install -g pnpm
    - pnpm i
    - echo "Building..."
    - pnpm build
  script:
    - rsync -azPhhr -e "ssh -p $SSH_PORT" .vitepress/dist $SSH_USER@$SSH_IP:/home/$SSH_USER/www/$CI_PROJECT_NAME/.vitepress/dist-$CI_JOB_ID
    - ssh -p $SSH_PORT $SSH_USER@$SSH_IP "
      . ~/.zshrc &&
      cd /var/www/$CI_PROJECT_NAME &&
      git pull &&
      docker exec $DOCKER_CONTAINER rm -rf /usr/share/nginx/html/node_modules &&
      docker exec $DOCKER_CONTAINER rm -rf /usr/share/nginx/html/.vitepress/dist &&
      docker cp .vitepress/dist-$CI_JOB_ID/dist $DOCKER_CONTAINER:/usr/share/nginx/html/.vitepress/dist &&
      docker restart $DOCKER_CONTAINER &&
      rm -rf .vitepress/dist-$CI_JOB_ID &&
      docker logs $DOCKER_CONTAINER
  only:
    - main